Converting images to black and white using Lightroom

First off we need to open our image, go to File>Import Photos and Video, locate your picture and click Import. Next locate the modules at the top, currently it will be in Library, click the next one along, Develop. This brings up your selected image in the middle of the screen and on the right hand side is the control panel of the main adjustments you can make to your image.
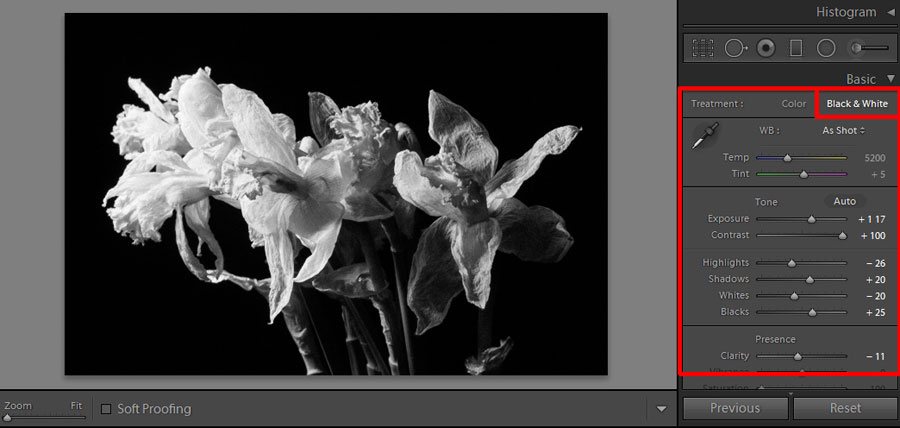
Certain guides would tell you to reduce the saturation down to -100, however to maintain maximum control in Lightroom we’re going to select Black&White from the treatment bar. We do this as it allows us complete control over all of the colour channels which gives us much greater control over the look of the image. I like my black and white images really contrasty, so whack the contrast up to maximum. I love the use of chiaroscuro in classic paintings and think this much contrast in this instance using a single light, emphasises form, shape and texture. I then drop the highlights and whites to preserve all the data in the high range and then push the shadows and blacks up to boost the midtones of the image. The Clarity slider is weird and adds a cartoony look to photographs, slide it around to see what I mean, I prefer the film look to my images which is achieved by reducing the Clarity to make the image slightly softer.
Next I add grain, again I prefer the film look to the over processed plastic style that some photographers use. Grain should be applied in the right circumstances and still life in my opinion is the perfect subject. It removes it from the present and gives the image a timeless quality.

After that we play with the Tone Curve, this can be dragged around directly on the graph itself or using the sliders below. In order to set you black and white point click on the little line with a dot on it in the bottom right hand corner. Once selected you can drag the line on the graph from the bottom right corner upwards whilst hugging the left hand side. This will adjust where the output of black starts and make your images even more contrasty!

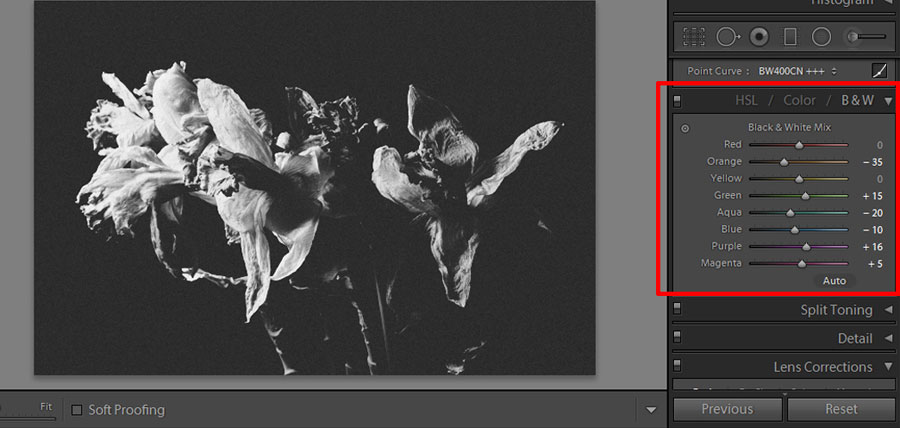
Lastly we’re on to the channel mixer. This is the reason we selected black and white at the start and didn’t drag the saturation down. The mixer gives us complete control over the channels of data that still exist in the colour frequencies, despite them not being visible, play with these as you see fit and explore the results. Write them down for future reference. The beauty of lightroom as a program is that once you have established your perfect black and white photograph settings, you can save it as a preset and then apply it to all of your photographs in one go, mega time saver.

