
My lovelies! Ready to give your digital images a little extra oomph before sharing them with the world or printing them for your wall? You’ve come to the right place! Today, we’re diving into the whimsical world of Lightroom export settings—a topic as boring as it sounds! No not really, but I’ve got to add some zip tot eh post otherwise you may die of boredom.
Lightroom is a quality piece of software, I couldn’t live without it. It’s incredibly powerful and like any new piece of software can seem daunting, so I’ve put together the most import export settings you should know so your pictures come out exactly as you intended.
The Importance of Export Settings
Why should you care about export settings? Because they are the secret sauce to making your images look their best, no matter where they’re displayed.
Different applications have different resolution requirements, different DPI requirements, different format requirements, etc. etc. you need to know that you’re meeting image requirements first time every time. It saves you time, saves your publishers/editors headaches, and also means you don’t get emails last thing at night from the graphics department asking for a different file format.
How to Export One or Multiple Images at the Same Time
Within Lightroom’s Develop Module, begin by highlighting every image you wish to export.
You can highlight multiple images that are all in a sequence by clicking on the first image, holding shift, then clicking on the last image in the sequence. Or, you can hold ctrl and click images individually.
Following this, navigate to the upper left corner and select File, then Export. A fresh window will emerge, where I’ll guide you through each setting I employ for exporting my photographs.
 Export location – (Where you’re going to save them to)
 Export location – (Where you’re going to save them to)
First things first, where are you going to put your images?
Click on ‘Choose’ and a select where you want to save your pictures.
If you want you can click on the tick box underneath ‘Put in Subfolder’ – you then have the option to enter the name of the new folder and Lightroom will create a brand new folder in the location you specified.

File Naming
Entirely up to you what you call your pictures, just name them something relevant so you can find them again in future.
As part of my process I never bother with custom names, I typically export the filenames as is and then do another cull and final batch rename in Adobe Bridge.
BUT! The option is here if you want it.

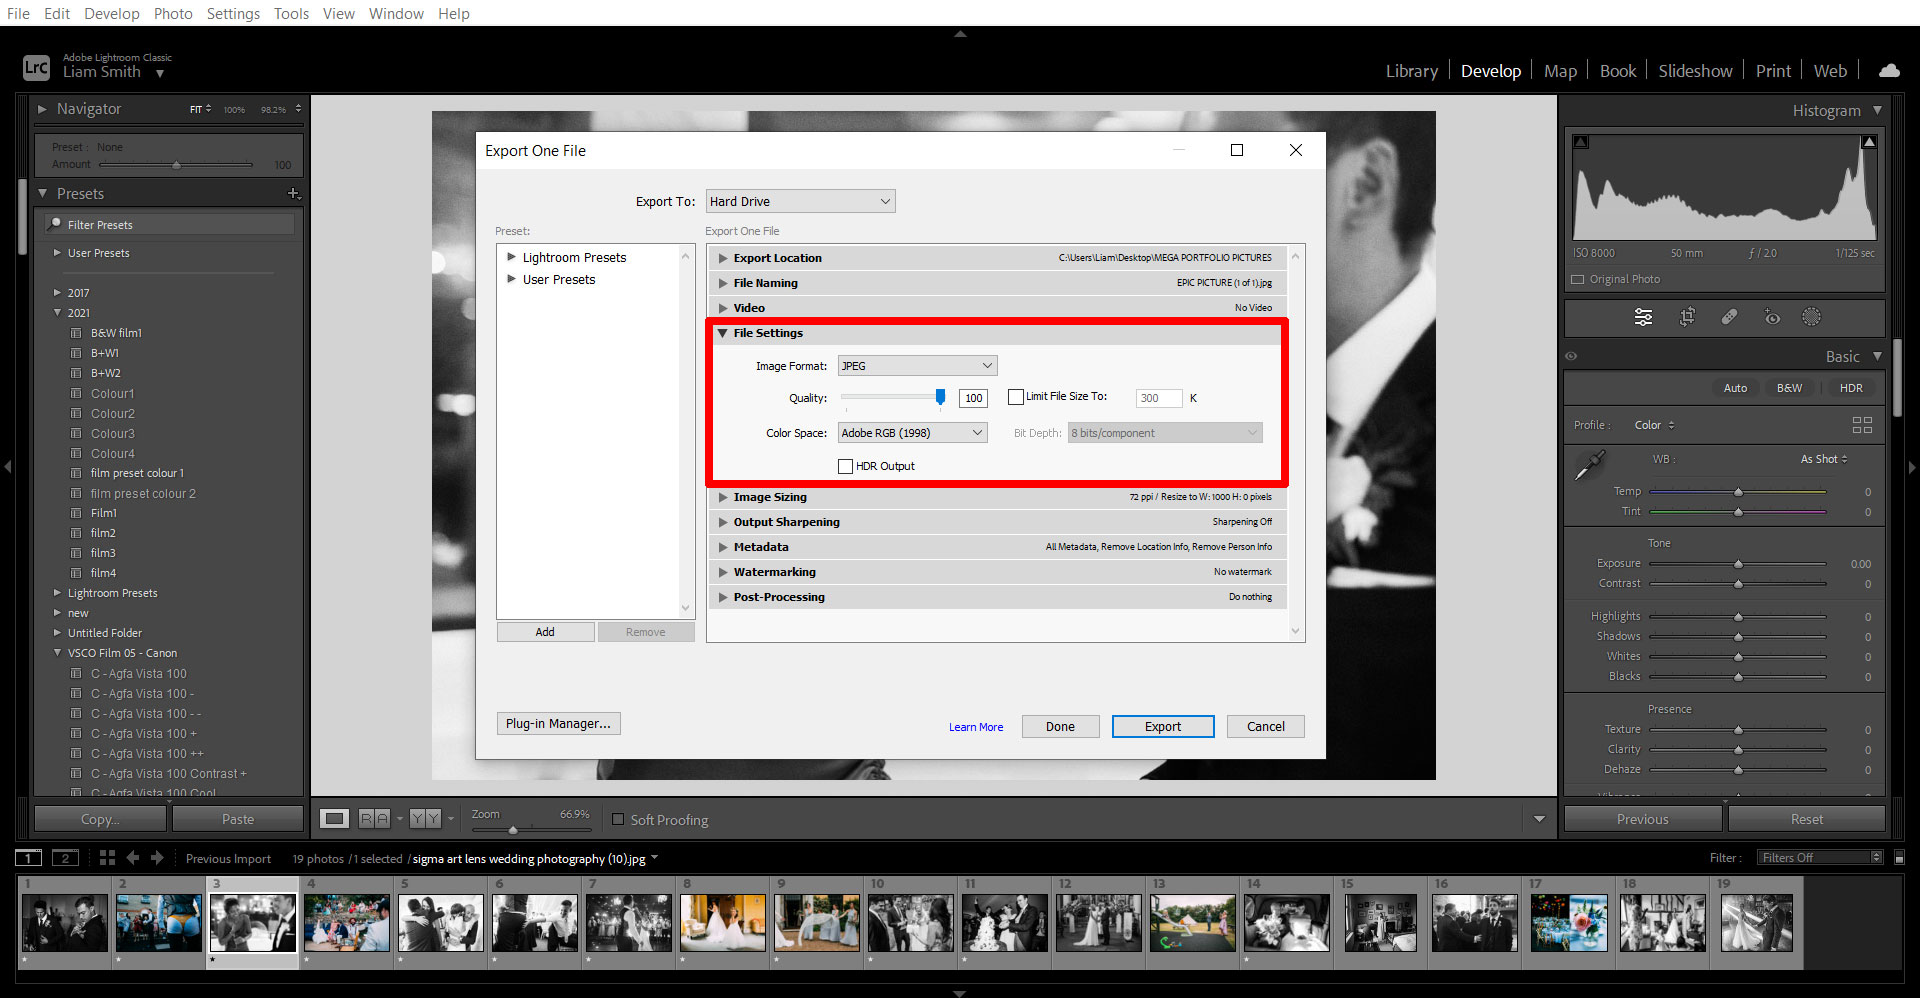
File Settings
Here you need to decide the format you want your pictures.
Jpeg is going to be the most widely used format and TIFF a distant second. You can select other formats, DNG, PSD etc. but it all depends on your requirements.
You can set what quality of jpeg you want out of 100, the best bet though if you’re trying to keep to a file size limit (you don’t want enormous pictures on a blog post for example) is to tick Limit File Size and specify in kb how big you need the file to be.
For full size JPEGs for a client gallery use quality 100 and leave Limit File Size unchecked so they come out full size.
Colour space – for web you want sRGB, for anything else AdobeRGB is considered a standard.
How To Size Your Images
If you’re sizing for a website, the likelihood is 2000px on the longest side is going to be enough, but check with whoever you’re supplying the images too what they need.
In this example I’ve set the width to 1000 pixels, I’ve left the height on zero – this tells Lightroom I want the width to definitely be 1000pixels and it will set the height appropriately to keep the aspect ratio the same.
If you’re exporting for use on a website you need the Pixels Per Inch set to 72.
If you’re exporting for print, set the PPI to 300.
To get the absolute highest possible resolution, just don’t click Resize to Fit and Lightroom will export them at the highest possible resolution.

Metadata
Hopefully you’ve got your Copyright information saved in your files. Your name, company name, website etc. This helps if your images ever end up being used without your permission.
On this setting include All Metadata and you’re good to go.

Press Export and you’re done!
That’s it for my step by step on how to properly Export images from Lightroom, now let’s look at specifics!
The Ultimate Lightroom Export Settings
For Web
- Resolution and Quality: Aim for the sweet spot—high enough for crispness, low enough for quick loading. Experiment with 1500pixel width at 72DPI.
- File Format and Compression: JPEG at 80% quality is your BFF here.
- Colour Space: sRGB is the internet’s universal language.
- Sharpening: A touch of sharpening for screens will make those details pop.
For Print
- Resolution and Quality: Here, size does matter. Go high or go home. As big as possible at 300DPI.
- File Format and Compression: TIFF for the win, when quality is paramount.
- Colour Space: Adobe RGB (1998) or ProPhoto RGB for colour that jumps off the page.
- Sharpening: Tailor this to your paper type—more on matte, less on glossy.
For Social Media
- Resolution and Quality: Keep it light; your followers will thank you. 1080 Pixels is as high as Instagram can go, stick with 72DPI
- File Format and Compression: JPEG, but watch those compression artefacts.
- Colour Space: Stick with sRGB for colour consistency across devices.
- Sharpening: Just a hint, to make your images stand out in the feed.
Hope this helps!