Photography can most certainly be overwhelming to begin with, every camera has multiple buttons and seemingly infinite ways of customising them.
Nailing the fundamentals is going to be key to enjoying your journey with this newfound hobby or career path.
With modern SLR cameras, there is no reason why you can’t learn about exposure incredibly quickly. Being able to take photographs on your digital camera and see the results of the settings you have changed instantly means you’re going to pick it up much faster than say, if you were learning on a film camera.
The instant feedback of a digital camera combined with automatic exposure modes means that there is no excuse for taking a poorly exposed photograph as the camera will do most of the heavy lifting when it comes to calculating the correct exposure.
If you are simply looking for a means to take some off the cuff pictures on holiday, then by all means put the camera in automatic mode and have fun. No judgement here, I want everyone to enjoy taking pictures.
What I want to teach however, is control.
The camera is a tool, and it’s up to you how you wish to use it.
Sometimes however, the camera gets it wrong, and that’s when you need to know how to override it in order to get the best pictures.
In order to do that, you need to understand the effects of aperture, shutter speed and ISO.
What Is Exposure in Cameras?
In photography, exposure is the amount of light which reaches your camera sensor or film.
There are three settings used to control how bright the final image is.
There are two settings on your camera that control the amount of light reaching the cameras sensor mechanically.
One is Aperture, the other is Shutter Speed.
The third setting that affects brightness, ISO, works slightly differently. It artificially boosts the amount of light available.
All three affect the brightness of your photographs.
Each one also has a side effect which can be utilised for creative purposes.
Shutter speed affects movement, aperture affects how blurry your background is and ISO affects how grainy the picture looks for example.
So not only are you making choices based upon how much light there is available, you’re also making creative choices with these settings too.
Not only that, but any given scene can be photographed using a variety of settings that will each create a correct exposure.
Take these simple sums for example:
1+3+6 =10
7+1+2 = 10
5+1+4 = 10
Each of these sums gets you to the same answer of ten, but you can take different steps to get there.
Exposure works a bit like this.
Shutter Speed + Aperture + ISO = Exposure
You can alter one setting and then compensate with the other two to create a correct exposure.
In reading these articles, I hope you’ll get a really good base knowledge of what exposure is and how to control it to get the pictures you want.
There is however no substitute for practice, so no matter how much reading you do, you’re going to have to venture out and play with your camera.
To get you moving, here’s a quick overview of the three elements of exposure
Shutter speed
Imagine a window shutter. If you open it, light is let into the room.
If you close it, the room gets dark.
Your camera shutter is doing the same thing, only in a fraction of a second.
The shutter in a camera is a mechanical device that moves incredibly quickly over the top of the film or digital sensor.
The faster it moves, the less light can get in.
The slower it moves, the more light can get in.
You will see shutter speeds written as fractions.
I know…maths…I’m sorry…
But don’t worry, you don’t have to do any sums here.
All you have to know is that when you see a camera setting written with 1/ before it, it’s referring to the shutter speed.
A fast shutter speed I would class as anything above one sixtieth of a second, this would be written as 1/60
A slow shutter speed I would class as anything below 1/60, say, one tenth of a second, which would be written as this 1/10.
In shutter speed selection, when you see this symbol (“) written after a number, it is referring to whole seconds.
Ten whole seconds would appear on your camera or be written as 10”
The vast majority of modern digital cameras will have shutter settings ranging all the way from 1/8000 (one eight thousandth of a second) to 30” (thirty seconds).
On a bright sunny day, a photograph taken with the shutter open for thirty seconds is going to result in a picture that is completely white because too much light has been let in.
Equally on a dark winter morning, a photograph taken with a shutter speed of one eight thousandth of a second will result in a picture that is completely black because not enough light has been let in.
Let’s look at an example of shutter speed affecting the brightness of a photograph.
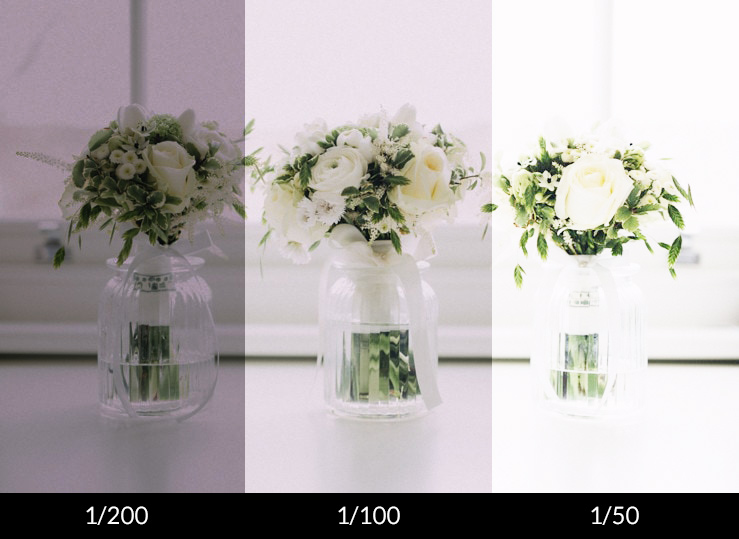
We can see as the shutter speed is halved each time, the image gets brighter.
Equally, when the shutter speed is doubled each time, the image gets darker.
It’s important you know the correct terminology when it comes to exposure.
The image on the left is too dark – Images that are too dark we call underexposed.
The image on the right is too bright – Images that are too bright we call overexposed.
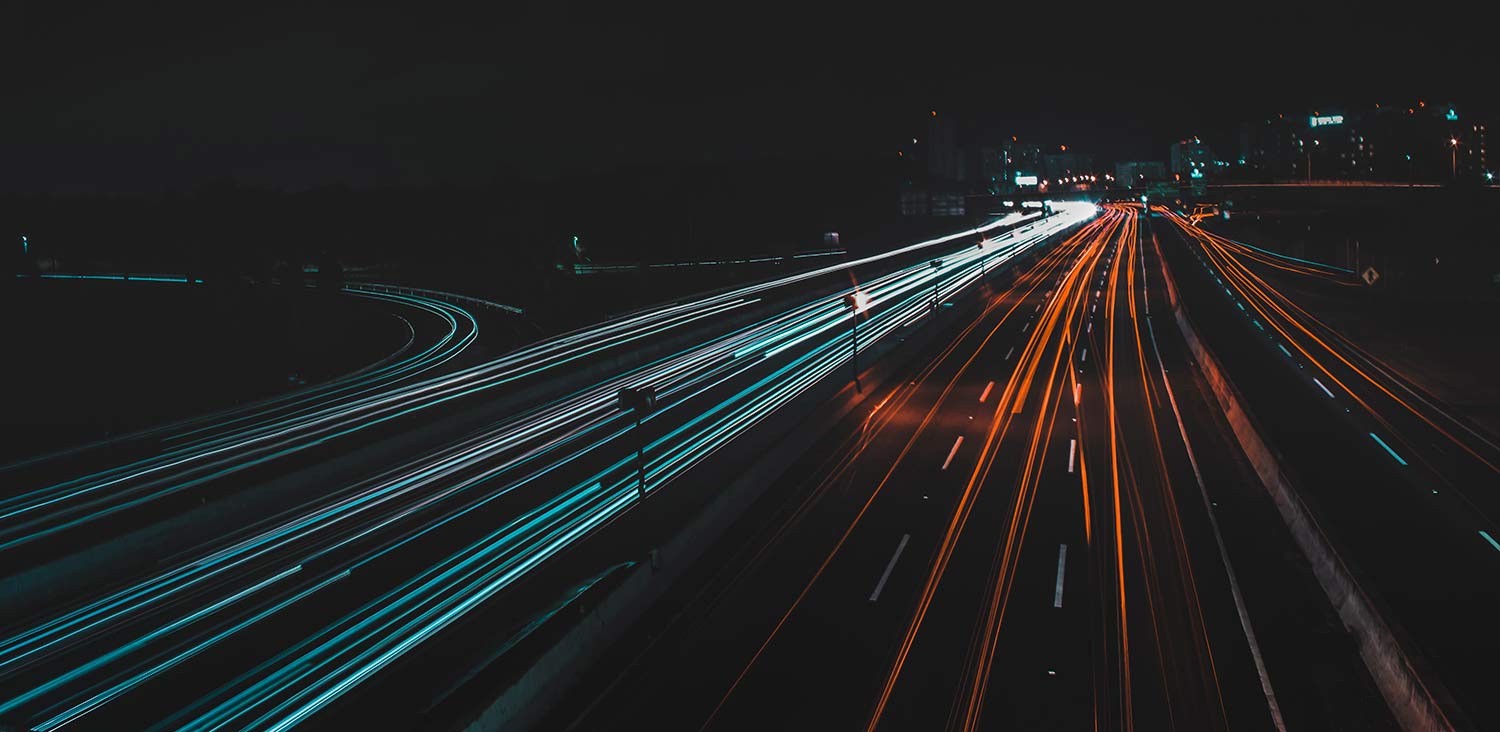
Shutter speed also controls movement as well as brightness
A fast shutter speed freezes any movement in the picture.
A slow shutter speed captures movement in the form of blur.
We can all agree that birds fly pretty fast. If you are photographing an Eagle flying, and you want a crystal clear photograph that completely stops the movement, then you’ll need a fast shutter speed to freeze the picture.
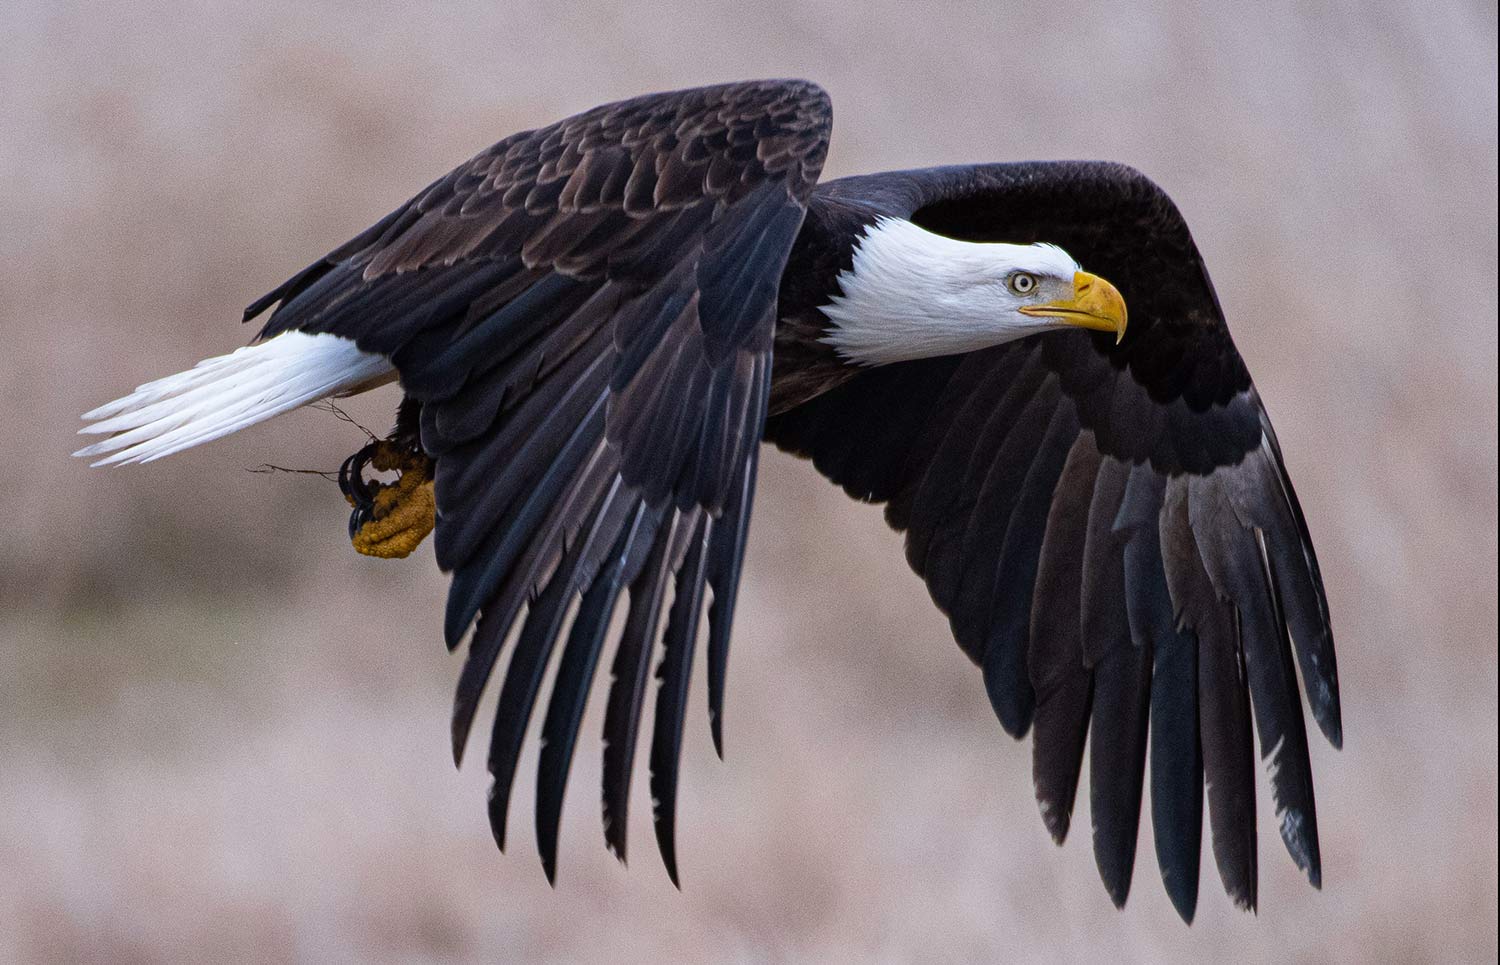
To capture a picture like this, you will need to use a very, very fast shutter speed. Realistically 1/1000 or faster.
How about capturing movement on purpose? If fast shutter speeds give us no movement, then we’ll need a slow shutter speed.
Let’s say you want to capture the movement of cars as they drive past. We need to allow enough time for a car to drive past us, which can sometimes be a few seconds.

To capture a picture like this, we would need to use a shutter speed of at least five seconds 5″.
It would be impossible to hold the camera still in your hands with a shutter speed this slow, which is why we would then use a tripod.
As a general rule when starting out, to make sure you don’t have blurry images when holding the camera in your hands with no tripod, your shutter speed should always be above 1/60.
Now, with our shutter speed selected to be either fast or slow depending on our circumstance, we need a second setting to help balance the exposure and to alter the amount of light that can enter the camera in order for our picture to come out the right brightness, or the correct term, correctly exposed.
To control the rate, we need Aperture!
Aperture
Aperture literally just means a hole.
A window in your house is an aperture for example, how much light that can enter the room is determined by the size of your windows.
Big windows = lots of light/a bright room
Little windows = not much light/a dark room
An aperture in photography just means a hole in the lens and works in the exact same way.
A big hole in the lens, allows a lot of light into the camera so the image will be brighter.
A small hole in the lens, restricts the amount of light getting into the camera, so the image will be darker.
You can’t change the size of your windows in your house with the press of a button to make your room brighter or darker, but with a camera aperture, you can change the size of the hole in your lens to make the image brighter or darker.

The aperture, as we can see in the image above, is a hole in the lens.
The size of the hole can be changed depending on how bright or dark we want the image to be.
You will see aperture written as f/ followed by a number.
Why?
f/ means factor, and is used in photography to create a standardised measure of light.
We’ll go over the details (and the maths!) of this in another article.
For now, all you need to know is:
A big hole – so lots of light and a brighter image – corresponds to a small f/ number.
A small hole – so not much light and a darker image – corresponds to a big f/ number.
For context, if you put a pin through a piece of paper, the hole it leaves behind would be a big number, something like f/64.
A small number would mean a massive hole, something like the size of a toilet roll tube.
The confusing part
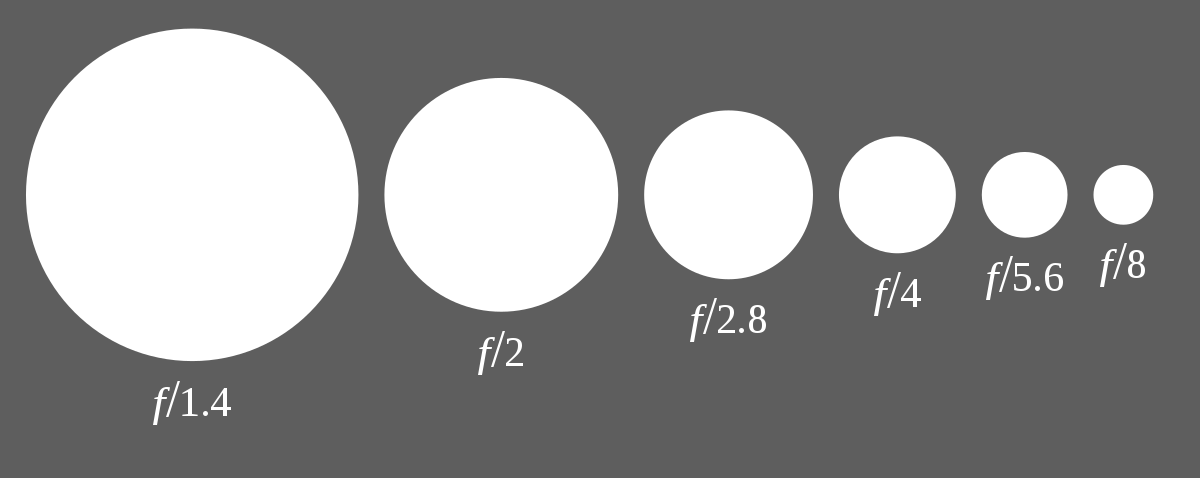
Whilst with shutter speed, the numbers halve and double quite nicely, with aperture, it’s a bit different.
The numbers on the f/scale don’t double and halve as whole numbers, instead, they go like this:
2.8, 4, 5.6, 8, 11, 16, 22.
Where each one let’s in half as much light as the one before it.
Visually, it would look like this:
Let’s look at an example using the same image as before.

The hole gets bigger, the image gets brighter.
Aperture also affects something called depth of field.
What is that?
Depth of field is how we say ‘how much of the image will be in sharp focus’
Look at the image below.
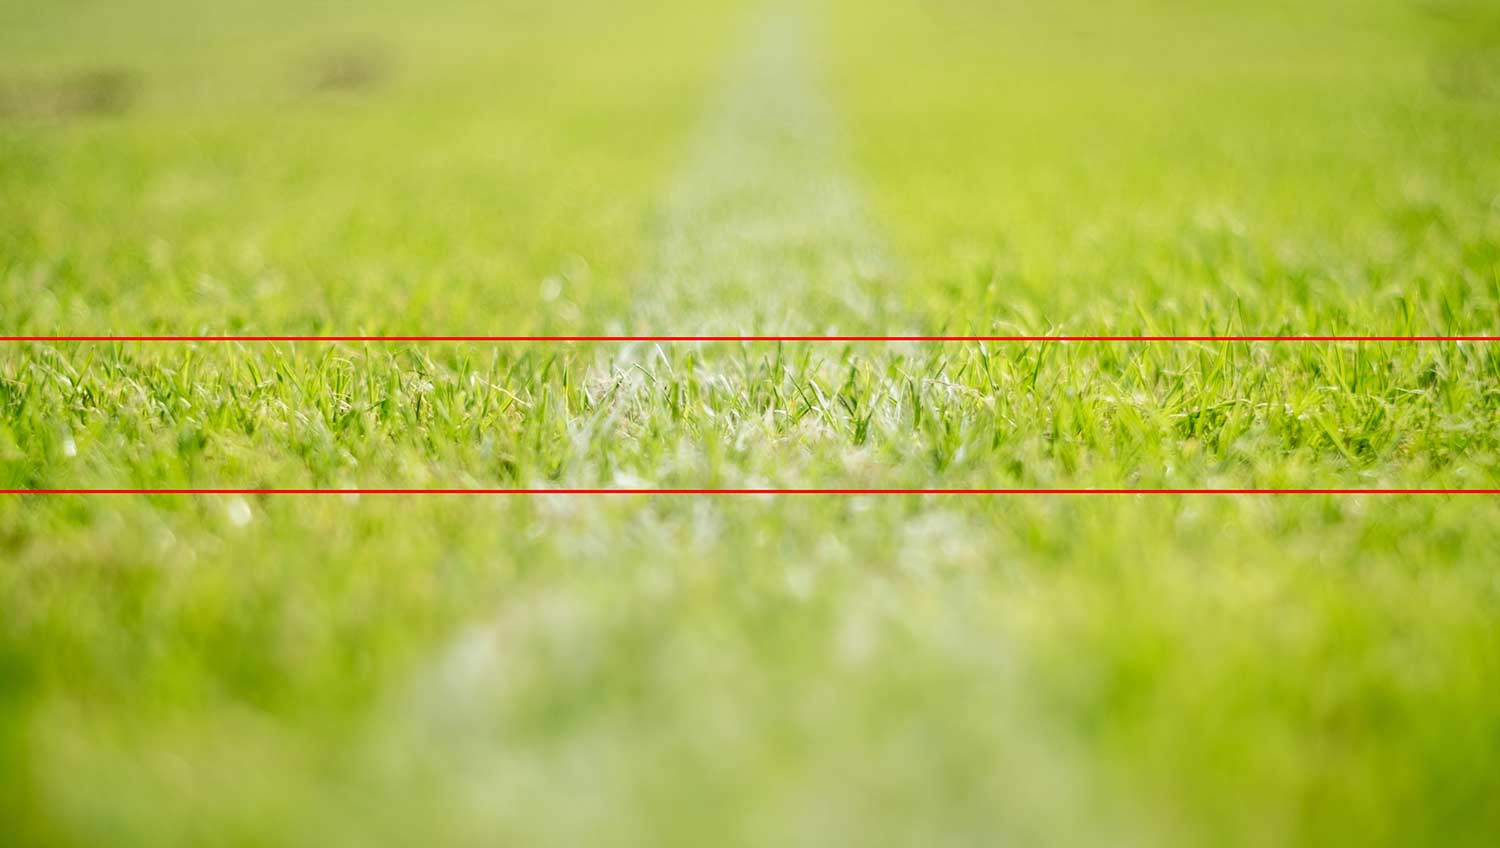
See how a small part of the image is sharply in focus, and the rest is out of focus?
The distance between the two red lines is how much of the image is in focus, in photography we call this the ‘depth of field’.
If you use a small number (big hole), then you get an image like the one above, where only a very small part of the picture is in focus.
If you use a big number (small hole), then you get an image like the one below, where the entire picture is in focus.
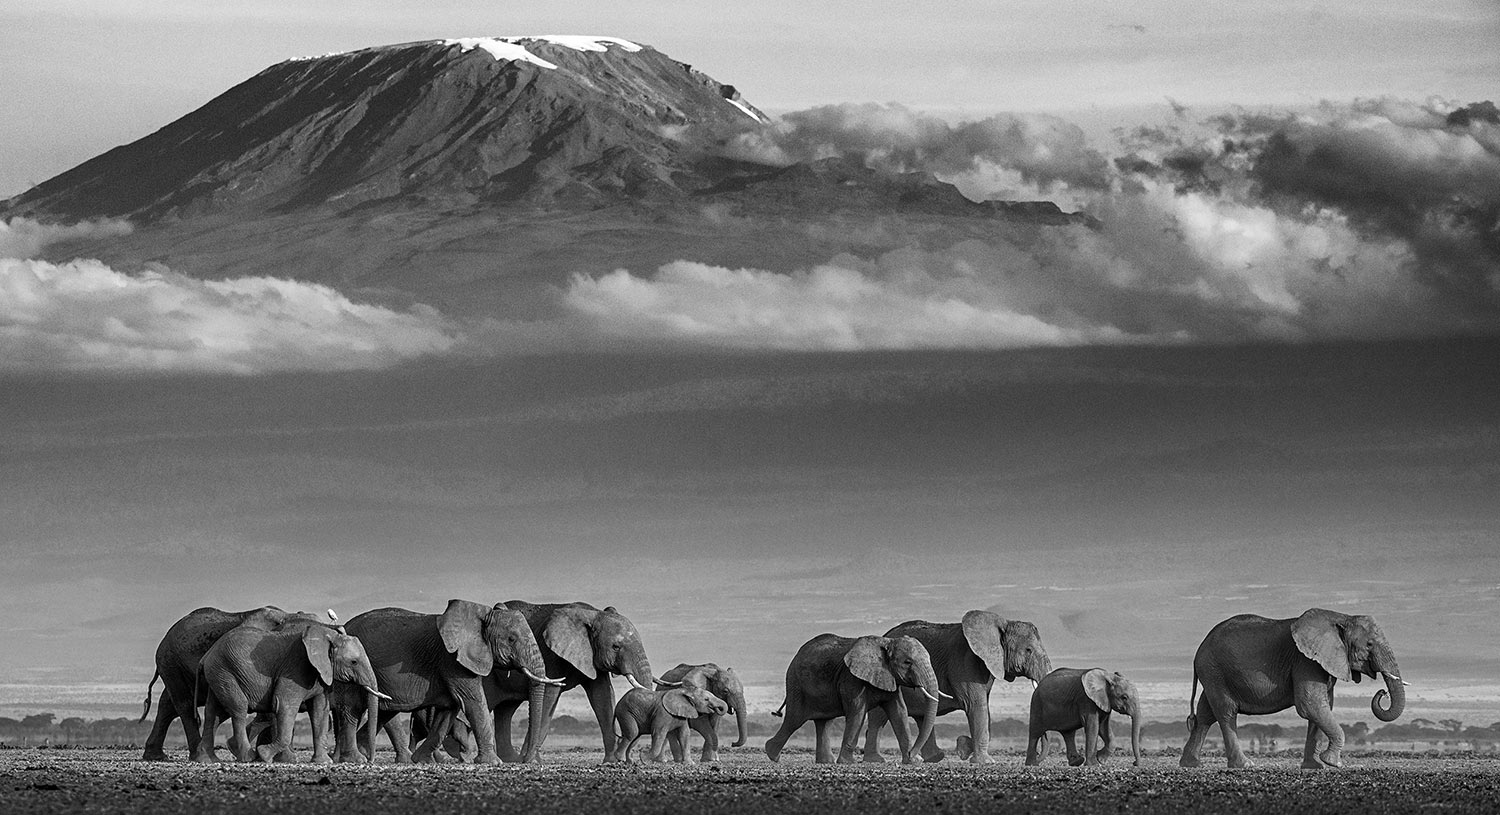
Notice how the Elephants in the foreground are in sharp focus AND the mountains in the background are too. This is a deep depth of field.
Aperture not only controls how bright or dark the image is, it also gives us creative choices to make too with depth of field.
Shutter speed and aperture work in combination to allow you to create an accurate exposure
Recap.
Let’s say for example, that you want to take a photograph of a bird in flight.
You’ll need a very fast shutter speed to freeze the movement of the bird.
In order to let in as much light as possible to achieve a fast shutter speed, you’ll need a really big Aperture.
Now, let’s say you want to take a picture of a landscape and you want the whole image to be in sharp focus, from the foreground to the background.
It’s morning, just before the sunrise, so there’s not much light.
You’ll need to choose a big number Aperture to make sure the whole picture is in sharp focus. But the small hole means not much light is getting into your camera.
In that case, we’ll need to use a slow shutter speed to make sure enough light can get in to create a correct exposure.
New scenario.
Now imagine you are at a wedding.
You want the people to be clear, with no motion blur – we need a fast shutter speed.
It’s getting dark and we need to let in as much light as possible – we need a big hole for our aperture.
BUT. If we select both these settings, and our image still isn’t bright enough, what other options do we have?
ISO
The ISO setting is last on this list for a very important reason.
As a beginner in photography, it’s really important to understand how shutter speed and aperture work together to create an accurate exposure first, before moving on to ISO.
The reason for this is that ISO creates something called noise in your photographs, and reduces the quality.

You see how the image is all speckled? That’s noise.
The higher the ISO you choose, the more this becomes visible.
From an engineering and mathematical point of view, ISO is very complex and creates a lot of heated discussion in the photography sphere. All you need to know as a beginner is the following:
The higher the ISO – the brighter the image will be.
The higher the ISO – the more noise you will see.
Hey, that rhymes! Poet and I didn’t know it.
Let’s have a quick look at how ISO affects your exposure.

The higher the ISO, the brighter the image.
Continuing from our example scenario earlier from the wedding, where the shutter speed and the aperture couldn’t be changed, changing the ISO is our last option.
Where the shutter speed and aperture stay the same, increasing the ISO will make the image brighter and we will have an accurately exposed picture for our wedding client.
Bringing it all together
Remember the examples of the sums earlier?
1+3+6 =10
7+1+2 = 10
5+1+4 = 10
Let’s now update that example with our new found knowledge.
If I use the same image from before, I can take the exact same picture, with the exact same brightness, using many combinations of different settings:
1/160 + f/1.4 + ISO 2000 = accurate exposure
1/8 + f/1.4 + ISO 100 = accurate exposure
1/30 + f/5 + ISO 6400 = accurate exposure

Exposure is all of the individual elements of controlling light – Aperture, Shutter Speed and ISO – all combined to make a photograph that is neither too light or too dark.
In the above example, we cane see that even though the settings are changing, we are able to control the light and compensate for one setting, by adjusting another.
If we adjust the shutter speed from 1/160 to 1/8 we are letting in much more light, because the shutter is open for longer – so we need to compensate with another setting to reduce the light coming into the camera.
By reducing the ISO from 2000 to 100, we are reducing the brightness of the image, and the picture comes out the same brightness as before.
The same is true for the final picture.
If we move the aperture from f/1.4 to f/5, we are using a smaller hole, which is letting in less light. The shutter speed is slightly faster, moving from 1/8 to 1/30 which is also letting in less light. Thus, we need to adjust the ISO to compensate.
Conclusion
Understanding and controlling exposure is your top priority when starting out in photography.
Understand this first and you’ll be able to photograph anything.
Exposure in photography refers to the total amount of light the camera records, and ultimately, how bright, or dark the resulting image is.
There are three distinct elements of the camera that control exposure:
- Aperture – A mechanical device that exists in the lens
- Shutter speed – A mechanical device that exists in the camera body
- ISO – An artificial boost of the light to make the picture look brighter.
These three elements depend on each other to create an accurate exposure – an image that is neither too light or too dark.
When you change one of these settings, one or both of the other settings will also need to be changed to compensate and create an accurate exposure.
The three elements of exposure are also changed for creative reasons as well as to change the brightness of the image.
Shutter speed controls the amount of movement or motion blur in the image.
Aperture effects how blurry the background is.
The ISO affects brightness and the amount of detail in the picture.
That’s all for now.
For further reading when you have had a chance to play around with your camera settings, I have written in depth articles on each individual element.
What is Aperture in Photography